CSS – z-index
In CSS, “z-index” is a property that determines the stacking order of elements on a web page along the z-axis, which is the axis extending from the screen toward the viewer. It allows you to control which elements appear in front of or behind others, creating a three-dimensional effect in two-dimensional web design.
Here’s a simplified explanation:
- Higher Values Are Closer: Elements with higher “z-index” values are visually positioned in front of elements with lower values. This allows you to control the layering of elements, such as placing a navigation menu in front of a background image.
- Default Value: The default “z-index” value is 0. Elements with no “z-index” specified or with the same value are stacked based on their position in the HTML document flow.
- Negative Values: You can use negative values for “z-index” to move elements behind the default stacking order. This is useful for creating background effects or positioning elements behind other content.
- Parent-Child Relationship: Elements within the same stacking context are ordered based on their position in the HTML structure. However, a “z-index” value on a parent can affect the stacking order of its children.
- Stacking Context: Elements with “position: relative,” “position: absolute,” “position: fixed,” or “position: sticky” create stacking contexts, and their children are stacked independently within this context.
Understanding “z-index” is crucial for creating visually appealing and organized web layouts, especially when dealing with elements that overlap or interact with each other. It gives web designers precise control over the depth and layering of elements on a webpage, enhancing the user experience and design aesthetics.
Example:
In CSS, the z-index property is used to control the stacking order of elements on a web page. Elements with a higher z-index value will appear in front of elements with a lower z-index value. Here’s an example in HTML and CSS that demonstrates the use of z-index:
<!DOCTYPE html>
<html>
<head>
<style>
/* CSS styles for the first div */
.element-1 {
width: 200px;
height: 200px;
background-color: #336699;
color: white;
text-align: center;
line-height: 200px;
position: absolute;
left: 50px;
top: 50px;
z-index: 2; /* Higher z-index value */
}
/* CSS styles for the second div */
.element-2 {
width: 200px;
height: 200px;
background-color: #ff6600;
color: white;
text-align: center;
line-height: 200px;
position: absolute;
left: 100px;
top: 100px;
z-index: 1; /* Lower z-index value */
}
</style>
</head>
<body>
<h2>Z-Index Example</h2>
<div class="element-1">Element 1</div>
<div class="element-2">Element 2</div>
</body>
</html>Code language: HTML, XML (xml)Output :
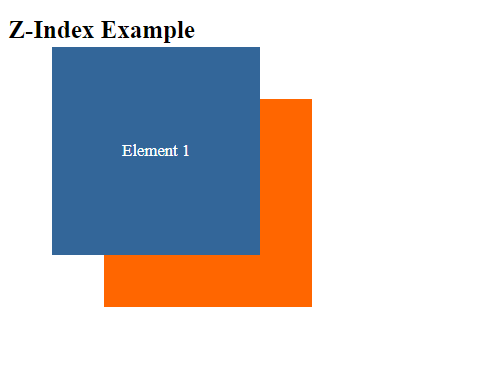
In this example:
- We have two
<div>elements with the classes.element-1and.element-2. - In the CSS, we use the
.element-1class to setz-index: 2;for the first<div>, giving it a higherz-indexvalue. - We use the
.element-2class to setz-index: 1;for the second<div>, giving it a lowerz-indexvalue. - Both elements have dimensions, background colors, and text styling applied to them.
When you open this HTML file in a web browser, you will see that the first <div> with a higher z-index value appears in front of the second <div> with a lower z-index value. This demonstrates how the z-index property can be used to control the stacking order of elements on a web page.
