JavaScript – Dialog Boxes
Dialog boxes are graphical user interface (GUI) elements used in software applications and websites to communicate with users. They serve various purposes, such as displaying messages, requesting input, or confirming actions. Dialog boxes are typically small pop-up windows that temporarily interrupt the user’s interaction with the main application or webpage to convey important information or solicit user responses.
Alert Boxes :
These display a message to the user, often to provide notifications, warnings, or information. They typically include an “OK” button for the user to acknowledge the message.
Example :
<!DOCTYPE html>
<html lang="en">
<head>
<meta charset="UTF-8">
<meta name="viewport" content="width=device-width, initial-scale=1.0">
<title>Alert Box Example</title>
</head>
<body>
<h1>Welcome to My Website</h1>
<p>Click the button below to see an alert:</p>
<!-- Create a button that triggers the alert -->
<button onclick="showAlert()">Show Alert</button>
<!-- JavaScript code for the alert box -->
<script>
function showAlert() {
alert("Hello! This is an example of an alert box.");
}
</script>
</body>
</html>Code language: JavaScript (javascript)Output :
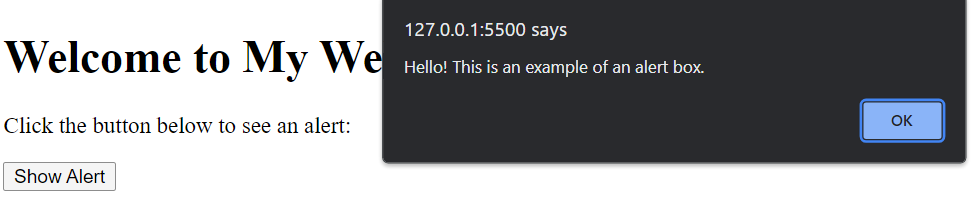
In this example:
- We have an HTML document with a heading, a paragraph explaining what the button does, and a button element.
- The button has an
onclickattribute that calls theshowAlert()JavaScript function when clicked. - Inside the
<script>section, we define theshowAlert()function, which uses thealert()method to display an alert box with the message “Hello! This is an example of an alert box.”
When you open this HTML file in a web browser and click the “Show Alert” button, it will trigger the showAlert() function, and an alert box will pop up with the specified message. This is a simple example of how alert boxes can be used to provide messages or notifications to users on a web page.
Confirm Boxes:
These ask the user to confirm or cancel an action. They typically include “OK” and “Cancel” buttons and are commonly used for actions like deleting a file or confirming a submission.
<!DOCTYPE html>
<html lang="en">
<head>
    <meta charset="UTF-8">
    <meta name="viewport" content="width=device-width, initial-scale=1.0">
    <title>Confirm Box Example</title>
</head>
<body>
    <h1>Delete Item</h1>
    <p>Are you sure you want to delete this item?</p>

    <!-- Create buttons to trigger the confirm box -->
    <button onclick="confirmDelete()">Yes</button>
    <button onclick="cancelDelete()">No</button>

    <!-- JavaScript code for the confirm box -->
    <script>
        function confirmDelete() {
            var result = confirm("Are you sure you want to delete this item?");
            if (result) {
                alert("Item deleted successfully.");
                // Add code here to delete the item from the database or perform other actions
            } else {
                alert("Item not deleted.");
                // Add code here to handle the cancel action
            }
        }

        function cancelDelete() {
            alert("Delete operation canceled.");
        }
    </script>
</body>
</html>Code language: HTML, XML (xml)
Output :
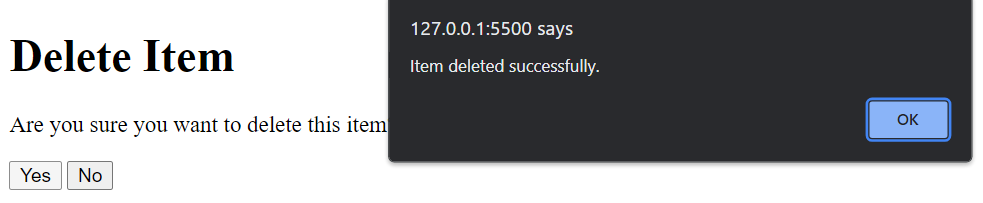
In this example:
- We have an HTML document with a heading, a message asking the user if they want to delete an item, and two buttons: “Yes” and “No.”
- The buttons have
onclickattributes that call JavaScript functions (confirmDelete()andcancelDelete()) when clicked. - Inside the
<script>section, theconfirmDelete()function uses theconfirm()method to display a confirm box with the message “Are you sure you want to delete this item?”. - Depending on the user’s choice (OK or Cancel), it shows corresponding alert messages. You can also perform additional actions based on the user’s choice, like deleting an item from a database or canceling the operation.
When you open this HTML file in a web browser and click either the “Yes” or “No” button, it will trigger the respective JavaScript function, and a confirm box will appear. This is a practical example of how confirm boxes are used to confirm user actions before proceeding with potentially critical operations on a web page.
Prompt Boxes :
These prompt the user to enter text or data, often for form submissions or data input. They include an input field along with “OK” and “Cancel” buttons.
<!DOCTYPE html>
<html lang="en">
<head>
    <meta charset="UTF-8">
    <meta name="viewport" content="width=device-width, initial-scale=1.0">
    <title>Prompt Box Example</title>
</head>
<body>
    <h1>Update Your Profile</h1>
    <p>Please enter your new username:</p>

    <!-- Create a button to trigger the prompt box -->
    <button onclick="updateUsername()">Change Username</button>

    <!-- Display the updated username -->
    <p id="updatedUsername"></p>

    <!-- JavaScript code for the prompt box -->
    <script>
        function updateUsername() {
            var newUsername = prompt("Enter your new username:");

            if (newUsername !== null && newUsername !== "") {
                document.getElementById("updatedUsername").textContent = "Your updated username is: " + newUsername;
                // You can add code here to update the user's profile with the new username
            } else {
                alert("Username not updated.");
            }
        }
    </script>
</body>
</html>Code language: JavaScript (javascript)
Output :
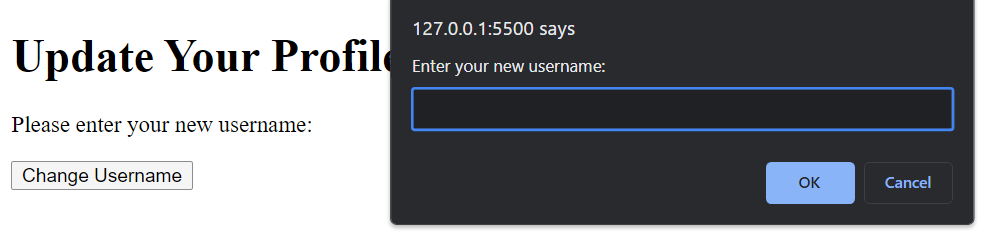
In this example:
- We have an HTML document with a heading, a message asking the user to enter their new username, a button to trigger the prompt box, and a paragraph to display the updated username.
- The button has an
onclickattribute that calls theupdateUsername()JavaScript function when clicked. - Inside the
<script>section, theupdateUsername()function uses theprompt()method to display a prompt box where the user can enter their new username. - Depending on the user’s input, it either updates and displays the new username on the webpage or shows an alert if the input is empty or if the user cancels the prompt.
When you open this HTML file in a web browser and click the “Change Username” button, it will trigger the updateUsername() function, and a prompt box will appear. This is an example of how prompt boxes can be used to collect user input and update information on a web page.
Related posts:

Powered by YARPP.